GSoC’18 completed well. Thanks to my mentors who guided me along and suggested ways out of ambiguous scenarios. View entire source code.
By the end of Phase 1 and Phase 2, I had accomplished all the intended tasks.
Phase 1 at a glance
- Completed Backend Implementation.
- Wrote some Generic and Reusable code snippets.
- Completed frontpage package.
- Completed home package.
- Started implementing add_experiment package.
Phase 2 at a glance
- Added PlUpload to upload file(s). Implemented all CRUD operations.
- Designed and completed Add Labels and Annotation Level Page module.
- Completed add_experiment package.
- Clubbed view_experiment package with add_experiment package.
- Started implementing results module.
- Started implementing annotate_experiment module.
This phase was headed towards completing results modules, admin and annotate_experiment packages.
Milestones achieved in Phase 2
- Added upload via spreadsheet facility to upload file(s) via spreadsheet.
- Completed annotate_experiment package.
- Completed results module. Added exporting results provision.
- Completed admin package.
Rapid Annotator User Guide
The Red Hen Rapid Annotator is designed to enable you to go through a large number of images in a very short period of time and to to get you started with minimal training.
Experimenter section
Initially you will be an annotator. You can make a request to admin to make you either an experimenter or an admin.
Basic Setup
The data needed for the Red Hen Rapid Annotator can be any of the following categories: Image, Audio, Video or Text. The allowed formats for the respective categories are: Text : txt, html Image : jpg, png, gif Audio : mp3, wma, mp2, wav Video : mov, mp4, wmv, webm
Data can be added either manually or viaSpreadsheet.
MANUALLY : Chooses files and upload them.
VIA SPREADSHEET : Content of each file should be in a separate row. Don’t leave any row blank in between. Start from the first row itself. Fill the following detail in each respective column
- Name
- Content - for text plain text, for image / video / audio - url to the location where the actual data is.
- Caption
Once files are uploaded you can modify name or caption of files by double clicking on the them in add_experiment page.
Adding Annotation Levels & Labels Click on Add labels in the main add_experiment page. Click Add Annotation Level to add a new annotation level for example height. You can add multiple labels like (tall, short, medium) to an annotation level. Hint: Use an additional label such as problem so your annotators can skip an item where they feel they would have to ask you first. Like this, you can later take a look at the problematic cases in detail.
You can add annotator / owner to your experiment either in main add_experiment page or in its settings page. You can assign any number of files with a specific annotator from settings page. You can also delete the experiment from there.
You also have freedom to bind any key with respective labels. Although if you leave it empty any default key binding will be made dynamically. You can also control in the order in which the annotation levels are displayed by providing annotation level number.
You can see results in the Results page by clicking on Results Page button in the main add_experiment page.
Annotator section
You can see all the experiments assigned to you in Experiment to Annotate tab of your home page.
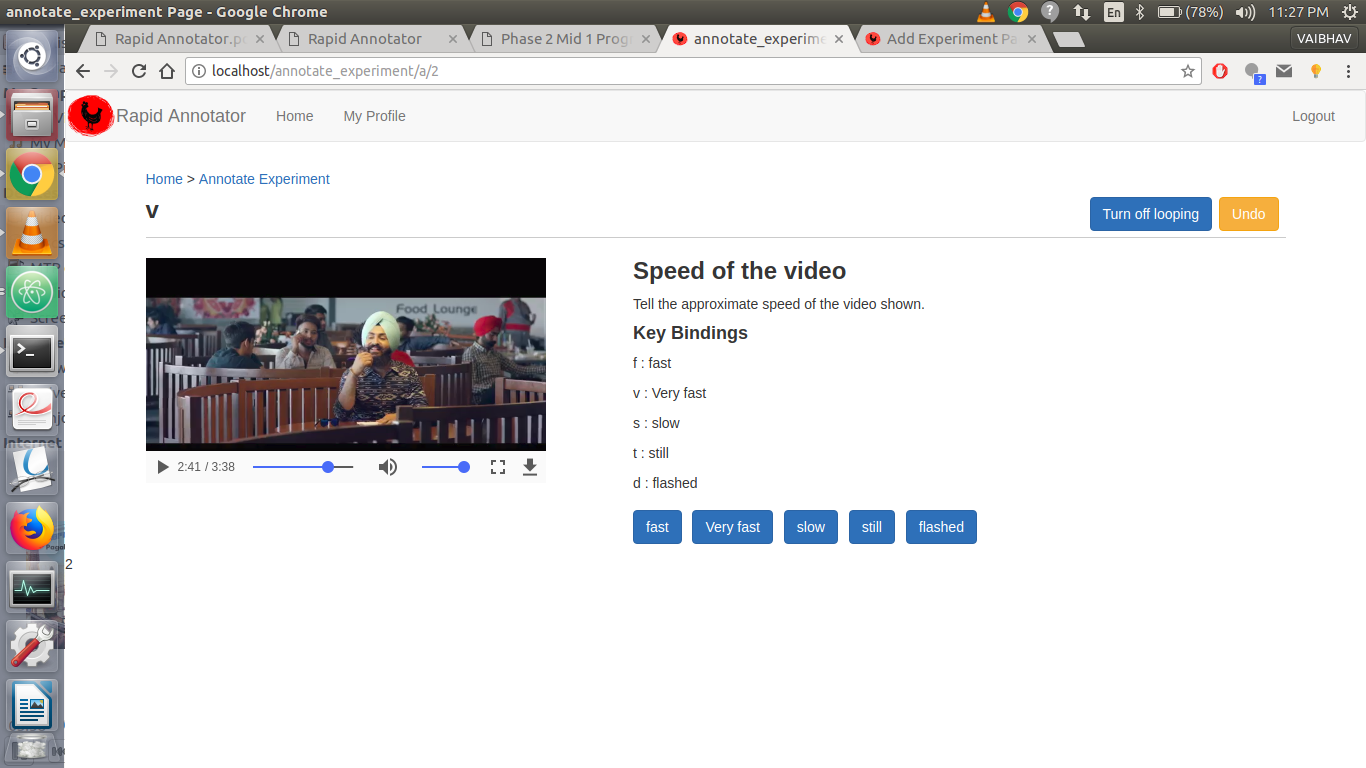
On clicking on any experiment you see the valid labels and the keys assigned to them. so in this case if the speed of the video clip is fast you press f, if it is not playing then still and so on. If you prefer to work with a mouse or a touch-device such as a tablet computer, you can also click the buttons at the top of the page. As soon as you press the key or the button, your annotation is saved to the server and the next annotation level(if any) is loaded. On all levels for a picture are annotated then next file is rendered for annotation. It is always possible to stop the annotation process and come back later.
You can also UNDO any annotation that you wish to. But once all the files are annotated there is no going back.
Looping feature enables you to turn on / off looping of audio - video clips.